Getting started
In this section we’ll be installing a few things, writing a simple blueprint and executing ourselves a state machine.
Install Node.js
First ensure you have Node.js installed… Tymly requires at least v8.5.0.
To check everything’s OK, try the following from the command line:
$ node --version
v8.5.0
Configure npm
The npm command (Node Package Manager) comes bundled with Node.js. But again, might be worth a quick check:
$ npm --version
3.10.10
Running npm behind a proxy
To download packages from npmjs.com, npm will need access to all your internets.
If you’re going to be using Tymly from behind a proxy server, then there’s some one-off hurt to get through at his point:
$ npm config set proxy       "http://domain%5Cusername:password@servername:port/"
$ npm config set https-proxy "http://domain%5Cusername:password@servername:port/"
Note: Use URL encoding to include
\characters (i.e. replace them with%5Cas above). More here.
To check npm is using your proxy correctly, try the following (which should contact npmjs.com to find out the latest published version of the tymly package):
$ npm show tymly version
0.0.15
Hello World!
To help show what Tymly is about we’ll go through the steps to get Hello World! printed to the console.
All functionality in Tymly is delivered via a state machine and state machines are defined inside blueprints.
So to get Hello World! onto the screen, we’re going to need ourselves a blueprint…
Nothing to it: make a directory, with a /state-machines sub-directory and a /blueprint.json file:
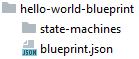
Edit the content of the /blueprint.json file, so it looks like:
{
  "namespace": "tutorial",
  "name": "helloWorld",
  "version": "1.0",

  "label": "Hello World! tutorial",
  "author": "John Doe",

  "organisation": "Tymly",
  "description": "Provides a simple flow to print 'Hello World!' to the console",
  "tags": ["tutorial", "test"]
}
- The important takeaway here is that our blueprint is named
helloWorldand it will live within thetutorialnamespace. Blueprints which share the same namespace can refer to each others components. The rest of theblueprint.jsonis meta tinsel.
Now we need to define a state machine for Tymly to execute
Create a /state-machines/hello-world.json file:

…and edit its content to:
{
  "version": "1.0",
  "Comment": "Logs 'Hello World!' to the console",
  "StartAt": "HelloWorld",
  "States": {
    "HelloWorld": {
    "Type": "Task",
    "Resource": "module:logging",
    "ResourceConfig": {
      "template": "Hello World!"
    },
    "End": true
    }
  }
}
That’s the blueprint finished!
- The keys of the
Statesobject are the unique names for each state in the State Machine. So in this example we’re working with one state with the nameHelloWorld - The
StartsAtproperty is mandatory: it indicates the first state which to run when the State Machine is executed - Please see the Amazon States Language specification for further information about how to conjure a State Machine
Now we need to create a project to run our new blueprint…
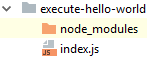
Make a totally fresh directory somewhere (not inside the blueprint) and create an /index.js file inside it:

Then, from within that directory, use the npm command to install the tymly package:
$ npm install tymly
After some huffing-and-puffing a new /node_modules directory should appear full of wondrous things:
Now we’ll make sure Tymly can boot without any problems… edit the /index.js to be:
'use strict'
var tymly = require('tymly')

tymly.boot(
  {
    blueprintPaths: [
      'd:/development/temp/hello-world-blueprint' // Change me!
    ]
  },
  // Callback function
  function (err, services) {
    if (err) {
      console.error('There were errors.')
    } else {
      console.log('Done booting.')
    }
  }
)
Make sure you change the blueprint path to point to your hello-world-blueprint directory, then from the same directory that the index.js file is located, run:
$ node index.js
…a chunk of output should then appear - for everything to have worked it should end with Done booting..
- This is a relatively exciting moment! Tymly has booted, consumed the demo blueprint and offered lots of ready-to-use services - the reason we’re not seeing
Hello World!yet is that we haven’t used any of those services.
Let’s execute a State Machine!
Edit the ./index.js file again, keep the changes you made previously but replace the callback function with:
  // Callback function
  function (err, services) {
    if (err) {
      console.error(err)
    } else {
      // No problems booting, so execute the State Machine...
      services.statebox.startExecution(
        {},  // input
        'tutorial_helloWorld_1_0', // state machine name
        {
          sendResponse: 'COMPLETE'
        }, // options
        function (err, executionDescription) {
          if (err) {
            console.error(err)
          } else {
            console.log('Done.')
          }
        }
      )
    }
  }
- As before, if everything goes as expected during the boot process, Tymly will offer some
services - Several services are returned to the callback function, including statebox that we’re using here
- The
stateboxservice offers an API with a few methods includingstartExecution. The minimum required to callstartExecution(as seen in this example) is a state machine name - here we’re usingtutorial_helloWorld_1_0. - These unique names are conjured by combining the blueprint’s namespace (
tutorial), the state machines’s name (helloWorld- which has been inferred from the/state-machines/hello-world.jsonfilename) and the version number of the state machine (as defined in the/state-machines/hello-world.jsonfile).
…once the replacement callback function is in-place, re-run:
$ node index.js
Boom! You should now see Hello World! printed on the console.
In this first tutorial we’ve used some of the major components of the Tymly framework (blueprints, state machines and services). The good news is that the distance from this point to running more complex state machines only requires the introduction of a few more components.